Home
::
GUIDE - Converting a 2-stroke chassis for a 4-stroke engine


GUIDE - Converting a 2-stroke chassis for a 4-stroke engine
GUIDE - Converting a 2-stroke chassis for a 4-stroke engine

GUIDE - Converting a 2-stroke chassis for a 4-stroke engine
Go Racing the cost effective way - 4-Stroke racing is now a massive sport nationally! By converting your kart to accept a 4-stroke engine you'll have access to the network of 4-stroke clubs around Australia offering low-cost, family focussed fun!
You can find our favourite kart clubs here: http://www.cutpriceracing.com.au/store/Club-Directory/
There are loads of other reasons you may want to convert a 2-stroke kart to a 4-stroke kart, many of them having a great deal to do with practicality. 4-Stroke engines are much more user-friendly for recreational and off-road uses, they're generally a lot cheaper, and they require a lot less maintenance. Replacement parts are inexpensive and readily available, and there are considerably more transmission choices such as torque converters.
We are frequently asked how hard it is to convert a 2-stroke chasssis to run a more practical 4-stroke engine so in this straightforward guide we're going to run you through the process.
It's easier than you probably think!
There are only two things that need to be done to a 2-stroke kart to fit and run a 4-stroke engine. In some cases you may have to do a third step. This guide will focus on all three steps:
1. Mount the engine
2. Swap the existing sprocket carrier from outboard to inboard location
3. (only required for some chassis) Modify rear cross-bar to clear rear axle sprockets
1. Mounting the engine
This is a very simple process. If your chassis already has a 2-stroke engine you can either opt to convert the existing 2-stroke mount, or you can choose a brand new billet horizontally adjustable mount.
Option 1 - Modifying the existing mount
Pros: It's cheap
Cons: If it's not 100% plumb straight it can damage engine crankshafts or other internal parts due to the twist and loading up of the transmission.
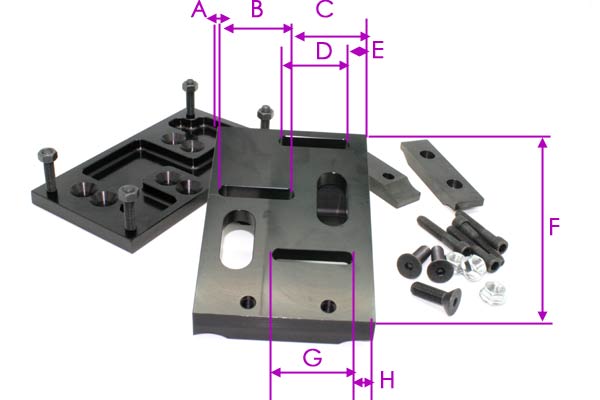
Because the 4-stroke engines generally have a different (larger) base plate, they will require a custom sandwich plate to be fitted to the current mount to accomodate the extra length. If you are moving from a KT100S or J engine to a GX200 (200cc) 4-stroke engine you'll only need to adapt the front holes further forward. This can be done with a pre-made adaptor plate (whcih can be found in our store in the mounts section) or you can create one yourself. We'll assume you've bought a pre-drilled adaptor plate, but if you make one yourself simply add a step to pre-drill the 4 holes for the engine (make sure these are perfectly square on the mount plate and that the plate is perfectly square otherwise you'll have trouble getting it perpendicular later).
The adaptor is fitted to the 2-stroke mount by drilling and bolting the front of the 2-stroke mount to the adaptor plate about 30% back from the front bolts for the 4-stroke engine. You will need to countersink these holes in the top of the adaptor plate and push the bolts through the top, using a locking nut at the bottom. It is very important to align the adaptor plate perfectly so that the engine is perfectly perpendicular to the rear axle. If it's not 100% plumb straight it can damage engine crankshafts or other internal parts due to the twist and loading up of the transmission.
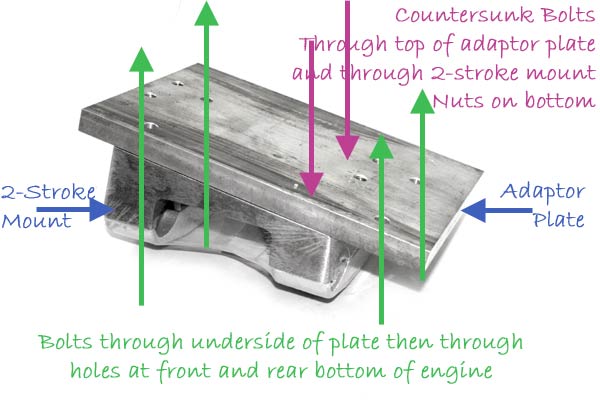
Set the engine up on the plate prior to drilling anything on the 2-stroke mount. Make sure the clutch on the engine is close enough to the seat that the clutch can engage with a chain and sprocket mounted in the inboard location on the axle.
Then drill through the pre-drilled holes in the rear of the adaptor plate straight through the rear of the 2-stroke mount. Fit the engine by placing it on the adaptor plate and threading 4 bolts through the bottom of the pre-drilled holes in the adaptor plate, up through the holes in the base-plate of the engine. Use locking nuts to secure the engine.
You can get an adaptor or mount here: http://www.cutpriceracing.com.au/store/Mounts/http://www.cutpriceracing.com.au/store/Mounts/
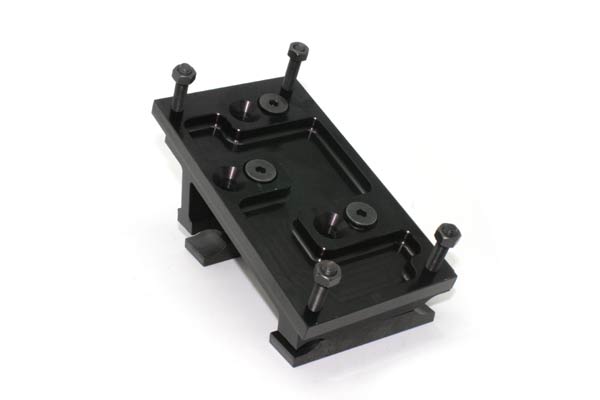
Option 2 - Using a billet adjustable mount:
Pros: 100% safe, fully adjustable (if later on you buy a competition clutch, or install a torque converter you'll be able to make extra room)
** Using a properly manufatured mount will ensure you do not mount your engine on a slight angle. If your engine is not 100% straight, additional pressure is put on the crankshaft in the engine as it turns, causing oil to squish out of the journal and can result in a seized engine. It's best to use a commercial mount if you're not 100% certain you can perfectly align your plate.
Cons: it's expensive
Simply remove your 2-stroke mount and clamp the 4-stroke mount in it's place. Place the engine on the mount over the studs on the mount plate and position the plate horizontally. Remove the engine, tighten the plate in position, then re-install the engine and use lock nuts to secure it to the studs on the plate.
You can get an adaptor or mount here: http://www.cutpriceracing.com.au/store/Mounts/http://www.cutpriceracing.com.au/store/Mounts/
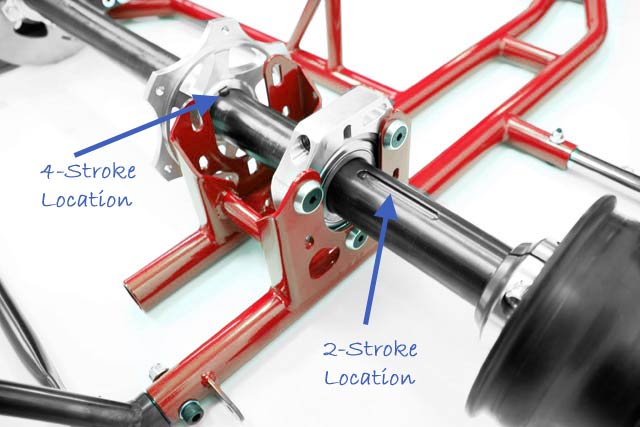
2. Swap the existing sprocket carrier from outboard to inboard location
Because the 4-stroke engine rotates in the opposite direction to the 2-stroke enigne, you'll be driving the transmission on the opposite side of the engine. This means you need to have the sprocket carrier on the inside of the frame, just inside the inner bearing (if fitted) or just inside the inner engine rail rather than between the wheel and the frame.
Don't worry that your sprocket is one-piece and your chain can't be split as you'll need to change over to #35 pitch anyway. #35 pitch chains have a joiner link so you can remove the chain without removing the axle, and the sprockets are 2-piece so they can be removed without removing the axle also - easy! They're not expensive, CPR offers a bundle of chain and sprocket for just $29.90.
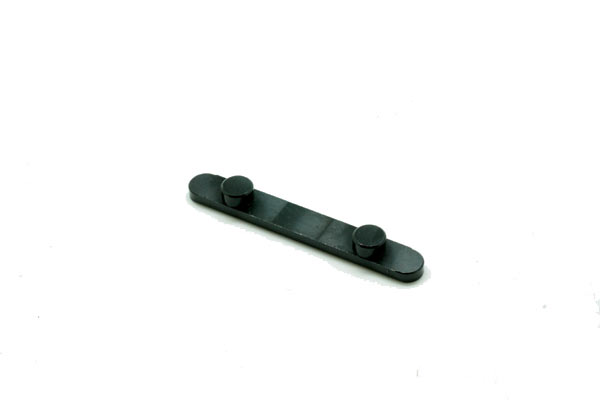
If you're running a CPR 40mm axle assembly this part is easy as both the 2-stroke fitment location and the 4-stroke fitment location have pre-cut keyways. If you're not, you'll need to either mill a keyway in the new location, or alternatively use a peg-key (a key with two small pegs) and drill two shallow holes in your axle shaft to mount the key.
You can get a peg key here: http://www.cutpriceracing.com.au/store/Key-for-Axle-8mm-Twin-Peg/
You'll need to remove the axle shaft to complete this step - remove the wheel and wheel hub, the sprocket hub, and the two bearings (if using a 3-bearing axle system) or one bearing (if using a two bearing axle system). Then re-install everything with the sprocket carrier before the bearing(s).
3. (OPTIONAL - only if necessary) - Modify rear cross-bar.
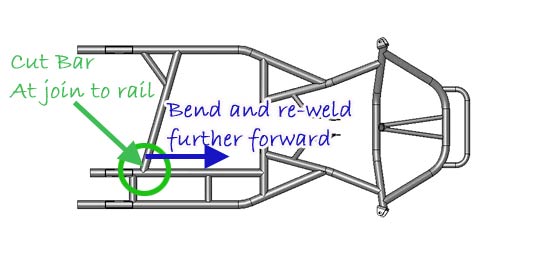
On some chassis, the distance between the axle and the bar that connects the left side rail and the inner engine rail on the right side together (one side of the kart to the other) which runs under or just slightly behind the seat, fouls on the sprocket in the new loaction. This happens generally with larger sprockets, or on older chassis which have not been designed for a sprocket to be in that location.
If you are running a CPR chassis you won't need to do anything at all as the bar has been designed for both 2-stroke and 4-stroke. A few chassis such as Azzuro work well, but some chassis such as older Arrow chassis will need the bar to be cut at the point that it connects to the inner engine rail, and bent slightly forward and re-welded again.
Conversion Video
Our friends at Crooked Garage have made a quick video on how to modify your frame. You can find it by CLICKING HERE


Need Help?

Gift Certificates

Categories
Bestsellers


Special
My Shopping Cart
My Shopping Cart
Cart is empty
My Account
Free Same-Day Dispatch!


Product Updates via Facebook

Get notified about our holiday times

We Accept Paypal

Outstanding Service!