Home
::
GUIDE - RT Go Kart Axle Assembly


GUIDE - RT Go Kart Axle Assembly
GUIDE - RT Go Kart Axle Assembly
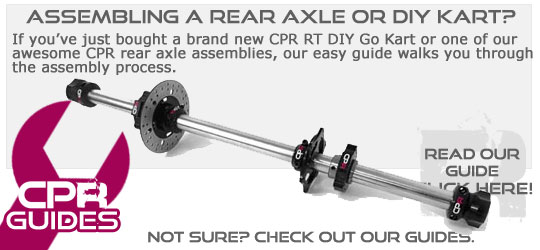
Rear Axle Assembly & Installation
This month we're showing you how to install our Axle Assemblies into a vehicle. In this guide we'll show you how to install it in our DIY RT senior kart kits. The process is the same no-matter which vehcile you are installing into except you may have some of the items in different locations.
REAR AXLE FIT KIT
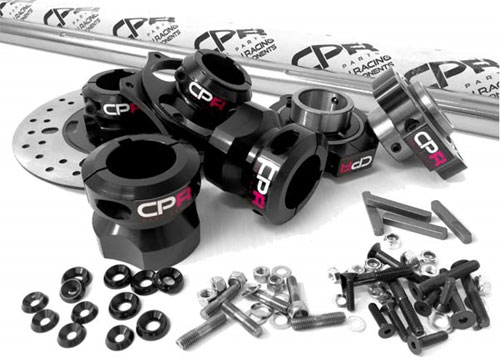
1x 40mm Axle Shaft
2x Wheel Hubs
2x Bearings installed in Bearing Carriers
1x Sprocket Hub
1x Brake Hub & Disc
1x Axle Fitting Kit:
4x Axle Keys
6x M8x50 Black Hex Socket Head Countersunk Bolts or Silver Hex Head Bolts
6x M8 washers
6x M8 Nyloc Nuts
6x M6x25 Black Hex Socket Head Countersunk Bolts or Silver Hex Head Bolts
6x M8 Studs
12x M6 washers
12x Nyloc nuts
Rear Axle Assembly & Installation
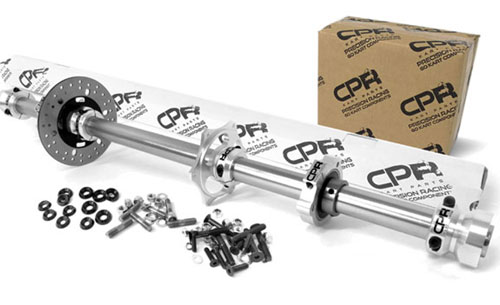
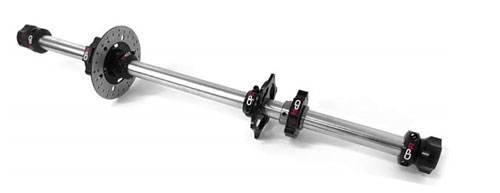
Rear Axle Assembly *PLEASE NOTE – SOME PICTURES MAY SHOW THE 3-BEARING MODEL, YOUR STANDARD KIT IS A 2-BEARING ITEM. IF DESIRED A THIRD BEARING MAY BE PURCHASED FROM US AND CAN BE INSTALLED. 6 pieces Partially assembled (2x Bearings and hangers, 1x Sprocket hub, 1x Brake hub and disc, 2x Wheel Hubs) *FIT KIT Axle Fitting Kit (See fit kit contents in the fit kit section)
Pre-Assemble Sprocket hub.
a. Attach your sprocket to the hub using the 6x M6 bolts, washers and nyloc nuts.
Pre-Assemble the axle.

The axle shaft has keys set in different locations for 4 stroke or 2 stroke use. For four stroke use (in-board sprocket), you will not require the keyway second from the right. Orient your axle assembly so that when you look at the rear of the kart, it is set as per the diagram above.
The two outer keys are for the wheel hubs. Centre keyway (3rd from the right) is for the sprocket hub, the keyway second from the left is for the brake hub.
If you are using the axle for 2 stroke purposes (outboard sprocket) you will not use the centre keyway and your sprocket hub will use the keyway second from the right.
4-Stroke Assembly procedure
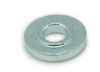
***NOTE: You will need the 4x 3mm thick spacer washers from the chassis fit kit for the rear axle assembly installation – they look like the picture below.
a. Insert the correct size key in the centre keyway, and the keyway second from the left.
b. Slide the Sprocket hub and sprocket over the axle from the right side with the protruding flange facing toward the left side of the kart and over the key in the centre keyway.
c. Lightly tighten the locking bolts. **LEAVE THE SPROCKET HUB LOOSE ENOUGH TO SLIDE ALONG THE SHAFT FOR ALIGNMENT AND FURTHER ASSEMBLY LATER IN THE KIT**
d. Slide the brake hub and disc over the axle from the left side with the protruding flange facing toward the left side of the kart and over the key in the centre keyway.
e. Lightly tighten the locking bolts.
f. FOR A THREE BEARING AXLE ASSEMBLY Slide a bearing and hanger assembly onto the right side of the axle, with the protruding flange facing outward toward the right side of the kart. Do not tighten the locking grub screws yet.
g. FOR TWO AND THREE BEARING AXLE ASSEMBLIES Slide a bearing and hanger assembly onto the right side of the axle, with the protruding flange facing inward toward the left side of the kart. Do not tighten the locking grub screws yet.
h. Slide another bearing and hanger assembly onto the left side of the axle, with the protruding flange facing toward the right side of the kart.
i. But up against the brake hub.
j. Insert the two remaining keys in the outer keyway locations.
k. Slide the wheel hubs onto the ends of the axles with the studs facing outward.
l. Position the hubs even with the edge of the axle and tighten.
m. Lift the completed axle assembly into the rear of the kart, ensuring the bearings locate within the brackets. You may need to shift some of the hangers and hubs to locate correctly.
n. Insert the 3x M8x50 Countersunk bolts in each bearing holder as per the next step.
o. Push each of the top two bolts through an M8 countersunk washer, then through the chassis bracket, then through a 3mm thick M8 spacer washer (from the chassis fit kit), then through the bearing hanger, then secure with an M8 *nyloc nut. Do not tighten fully.
p. Push the bottom bolt bolts through an M8 countersunk washer, then through the chassis bracket, then through the bearing hanger, then secure with an M8 nyloc nut. Do not tighten fully.
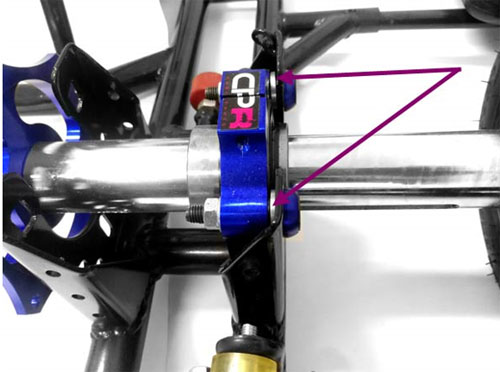
p. Repeat the process with the 3 M8x50 Countersunk bolts in the bearing brackets and bearing carriers on the other side. Do not fully tighten all bolts yet.
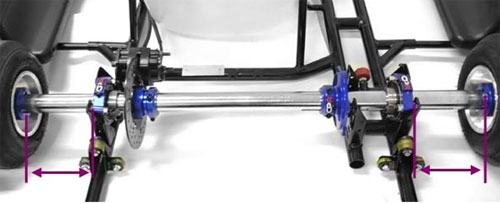
q. Check the to see if the axle shaft is centred correctly by measuring from the outside of each of the outer brackets to the inside of each of the wheel hubs. If the measurements are different, slide the shaft until the distance is equal.
r. Tighten all bolts.
s. Tighten the grub screws in each of the bearings.

t. fit the included M8 studs to the wheel hubs (it is recommended to use Loctite on the wheel hubs to ensure the studs do not wind out over time – or alternatively ensure they are checked regularly.
Well Done! You've successfully completed the assembly of the rear axle!

Need Help?

Gift Certificates

Categories
Bestsellers


Special
My Shopping Cart
My Shopping Cart
Cart is empty
My Account
Free Same-Day Dispatch!


Product Updates via Facebook

Get notified about our holiday times

We Accept Paypal

Outstanding Service!